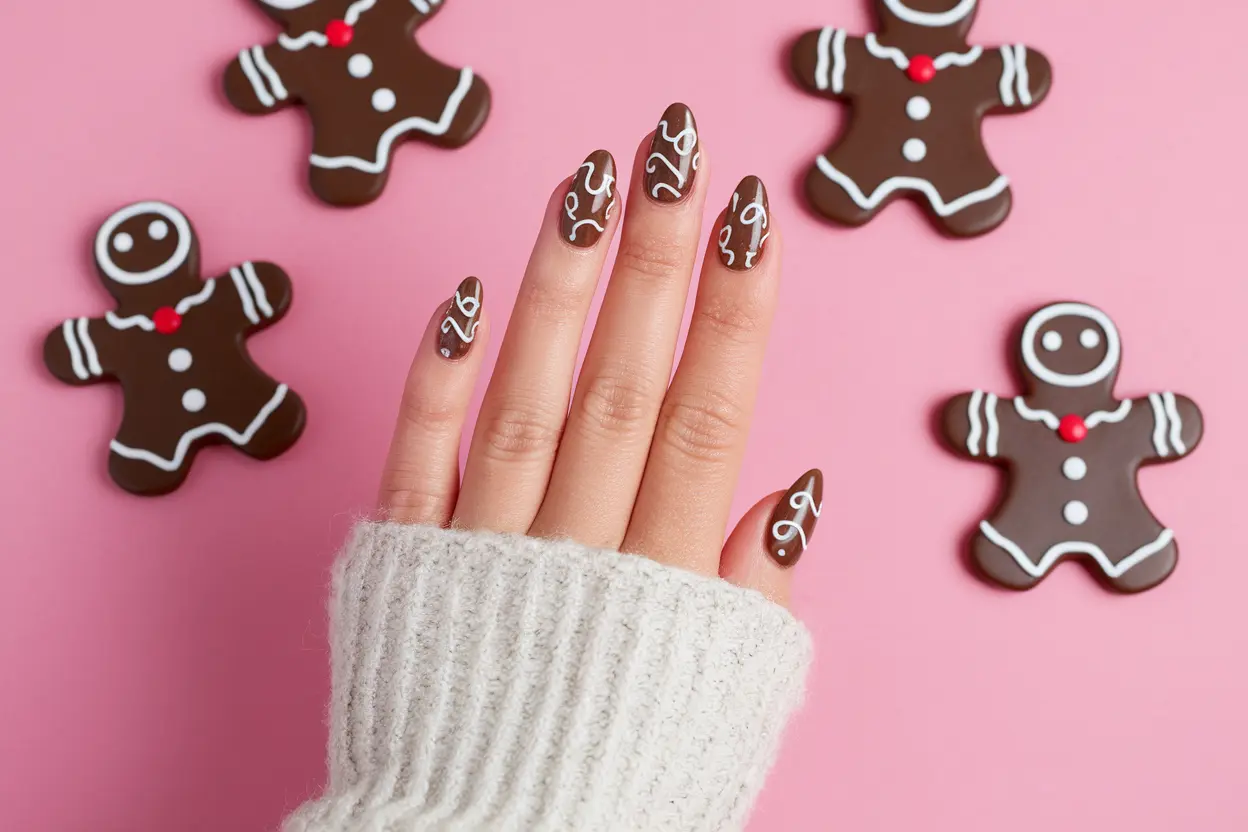
Many enthusiasts embrace the holiday season by showcasing their creativity through gingerbread nail art. To achieve the perfect festive look, it’s imperative to prioritize nail care to ensure your designs not only look stunning but also last long. By focusing on proper exfoliation, moisturizing, and choosing high-quality polishes, you can achieve a canvas that enhances your art. Additionally, taking care of your nails will prevent any unwanted breaks or chips that could detract from your delightful designs. Get ready to transform your nails into a festive masterpiece!
Essential Nail Preparation for a Flawless Base
Selecting the Right Tools for Nail Art
Your choice of tools can elevate your gingerbread nail art from basic to fabulous. Start with a good quality set of brushes, including fine detail brushes for intricate designs and flat brushes for filling in larger areas or creating smooth gradients. A dotting tool is also a must-have for creating those sugary sprinkles or gingerbread man facial features. Opt for a palette for mixing colors, which allows you to achieve the perfect shade of icing or candy without wasting paint. Don’t forget to stock up on nail tape or stencils if you’re looking for precision in your designs; these can help maintain clean lines and prevent smudging when working with multiple colors.
Importance of Nail Health Before Application
The condition of your nails plays a vital role in how well your gingerbread nail art will turn out and how long it will last. Before entering into your festive designs, take a moment to assess the health of your nails. If they are brittle or prone to breaking, you may want to consider a revitalizing treatment or a strengthening base coat. Regular moisturization, cuticle care, and avoiding harsh chemicals can significantly improve the integrity of your nails. Ensuring a healthy nail bed also helps products adhere better and lead to a smoother application overall.
Neglecting the health of your nails can result in unsightly chips or even cause the nail polish to peel prematurely. Incorporating a good nail care routine not only prepares your nails for design but enhances the final appearance of any nail art. A few simple steps like buffing to smoothen the nail surface, trimming hangnails, and applying cuticle oil can make a noticeable difference. Investing time in your nail health will ultimately pay off when you showcase your gingerbread creations this holiday season.
Choosing the Perfect Gingerbread Color Palette
Color Theory for Seasonal Nail Art
Your choice of colors can make or break the gingerbread nail art look. Utilizing color theory helps in creating an aesthetically pleasing design. Think about warm, rich browns that mimic freshly baked gingerbread, paired with festive shades of red and green for accents. Complementary colors can boost the visual interest; for instance, mixing a warm golden shimmer with a deep forest green creates a delightful contrast that draws the eye. Don’t shy away from experimenting with shades such as cream or white for icing effects, as they can really pop against darker base colors.
Consider the emotional response elicited by your color choices. Warm colors like red and orange evoke warmth and comfort, ideal for the holiday season, while cooler colors like teal can provide a fresh twist. Visualize how these hues harmonize together. For your gingerbread design, a mix of cocoa browns, peppermint reds, and sugar plum purples can create a festive yet sophisticated look that celebrates the holiday spirit and your creative flair.
Top Nail Polish Brands for the Holiday Season
Focusing on quality nail polishes pushes your gingerbread nail art to the next level. Brands such as O.P.I., Essie, and Orly offer a variety of seasonal colors that suit the holiday palette perfectly. O.P.I.’s “I’m Not Really a Waitress” provides a deep red ideal for a gingerbread accent, while Essie’s “Ballet Slippers” works great for subtle icing details. Orly’s “Golden Canary” adds a festive sparkle that enhances your designs beautifully.
Many of these brands also focus on formulations that ensure long-lasting wear. O.P.I.’s gel effects provide a glossy finish perfect for holiday parties, while Essie’s quick-dry formula allows for the swift application necessary during the hectic holiday season. Additionally, look for collections released specifically for the holidays, as they often feature exclusive colors that perfectly capture the festive mood, helping you stand out with your gingerbread nail art.
Techniques for Mastering Gingerbread Designs
Step-by-Step Guide for Iconic Gingerbread Patterns
| Step | Action |
|---|---|
| 1 | Start with a neutral base coat to create a smooth canvas for your gingerbread art. |
| 2 | Use a rich brown polish to mimic the appearance of gingerbread, applying two coats for opaqueness. |
| 3 | Once dry, select a white nail art pen or polish to draw classic gingerbread shapes like men, trees, or houses. |
| 4 | Enhance your designs with colorful dots and stripes using festive nail polishes. |
| 5 | Finish with a top coat to seal in your designs and add a glossy finish. |
These steps provide a clear roadmap to achieving that delightful gingerbread aesthetic on your nails. Utilizing a variety of nail art tools, such as dotting tools or thin brushes, can further refine your design and add unique flair. Exploring different color combinations or accentuating certain patterns will enhance the overall visual impact of your nail art.
Creative Incorporation of Textures and Glitter
Textures and glitter can elevate your gingerbread nail art by creating an eye-catching finish that reflects the charm of holiday confections. Consider adding a sprinkle of fine glitter on top of your wet topcoat, mimicking the sugary coating often found on gingerbread cookies. This not only adds sparkle but can also provide a tactile experience that draws attention.
Incorporating textures such as matte and glossy topcoats can create interesting contrasts that resemble the look of a well-decorated gingerbread cookie. Swirling a light matte finish over specific areas of your design will simulate the icing, while shiny accents will resemble the brightly colored candies decorating your ideal gingerbread house. By mixing and matching these effects, you can take your nail art to another level.
Protecting Your Nail Art Masterpiece
Best Top Coats for Longevity
Choosing the right top coat is imperative for safeguarding your gingerbread nail art. Look for a formula specifically designed to enhance durability and shine. A gel-based top coat often provides the longest-lasting finish, ensuring that your festive creations remain intact for weeks. Brands like Seche Vite and Essie Gel Couture are popular choices among nail enthusiasts for their quick-drying properties and high-gloss shields against damage.
A matte top coat can offer a unique twist if you want to stray from traditional glossy finishes. However, ensure the matte option still provides adequate protection. Urban Decay’s Sinful Colors Matte Top Coat is well-loved for its ability to protect while imparting a modern and chic look, perfect for your gingerbread-inspired designs.
Tips for Preventing Chipping and Wear
To extend the life of your gingerbread nail art, pay attention to your nail care routine. Regularly moisturizing your cuticles with cuticle oil not only promotes healthy nail growth but also reinforces your artwork from potential chipping. Choose oils infused with vitamin E, as they help strengthen your nails while keeping your art fresh and intact. Additionally, be gentle with your nails; avoid using them as tools to open packages or scratch surfaces, as this can lead to unsightly chips in your design.
Another effective strategy is to apply a quick-dry top coat every couple of days to refresh your nails and create a barrier against wear. This practice also adds a boost of shine and keeps your gingerbread nail art looking fresh and vibrant. Avoiding harsh chemicals and prolonged contact with water can further improve the longevity of your look, so wear gloves while performing chores or using cleaning products.
- Top Coats provide necessary protection for your nail art.
- Moisturizing Cuticles helps prevent damage and ensures a smooth finish.
- Regular Maintenance with quick-dry top coats can refresh your look.
Knowing the right products and techniques to use can make all the difference in maintaining your gingerbread nail art. Simple maintenance steps will buy you extra time with your festive designs!
- Avoiding Tools with your nails reduces the risk of chipping.
- Natural Oils support long-lasting elegance for your manicure.
- Gentle Care ensures your detailed designs remain intact.
Knowing how to adequately protect your nail art will help preserve your carefully crafted gingerbread designs so you can enjoy them throughout the festive season. Paying attention to both top coats and preventive care allows you to show off your creativity without worrying about daily wear and tear.
Seasonal Maintenance and Care for Your Nails
Essential Aftercare to Keep Your Nails Healthy
Your nails deserve some TLC, especially after a burst of creative nail art like gingerbread designs. Ensure you keep your nails hydrated by using a nourishing cuticle oil daily; this can prevent dryness and hangnails, which can ruin your art. Look for oils that contain natural ingredients like jojoba or almond oil, which enhance strength and flexibility. Additionally, consider applying a hand cream that targets the entire nail area—this keeps your skin soft and supple and encourages healthy nail growth.
A weekly soak in warm water with a few drops of necessary oil can provide much-needed moisture and relaxation. If you face nail or cuticle damage due to frequent painting, using a strengthening treatment once or twice a week can be necessary for restoring their integrity. Always take care to remove any polish gently, avoiding excessive filing or harsh removers that can strip your nails of their natural oils.
Seasonal Trends in Nail Art: What to Look For
As the seasons change, so do the nail art trends that capture the essence of each time of year. For the upcoming winter months, look out for designs incorporating elements like snowflakes, peppermint patterns, and glittering gold and silver accents. Textured finishes such as matte or velvet are also in vogue, allowing for a cozy feel that pairs perfectly with your gingerbread artistry.
Bright, festive colors are always in style for the holidays, so don’t shy away from bold reds or shimmering greens. As you explore new gingerbread nail art styles, think about enhancing your designs with seasonal stickers or stamps that can add dimension without the need for extensive freehand work, ideal for quick touch-ups or unique layering techniques.
Summing Up
Considering all points, achieving perfect gingerbread nail art goes beyond simply applying polish and designs. You need to prioritize proper nail care to ensure a smooth, vibrant finish that showcases your creative work. Regularly keep your nails trimmed, shaped, and moisturized to maintain their health and strength. With a solid foundation, your gingerbread nail art can truly stand out, with colors and designs appearing even more vivid and eye-catching.
Additionally, implementing techniques such as using a base coat and top coat not only prolongs the life of your nail art but also enhances its overall appearance. You want your gingerbread nails to not only look great but also feel comfortable and resilient. With your newfound knowledge of nail care, you are well-equipped to flaunt intricate designs and seasonal flair while ensuring your nails remain in tip-top shape. Get ready to impress everyone with your delightful gingerbread nail artistry!