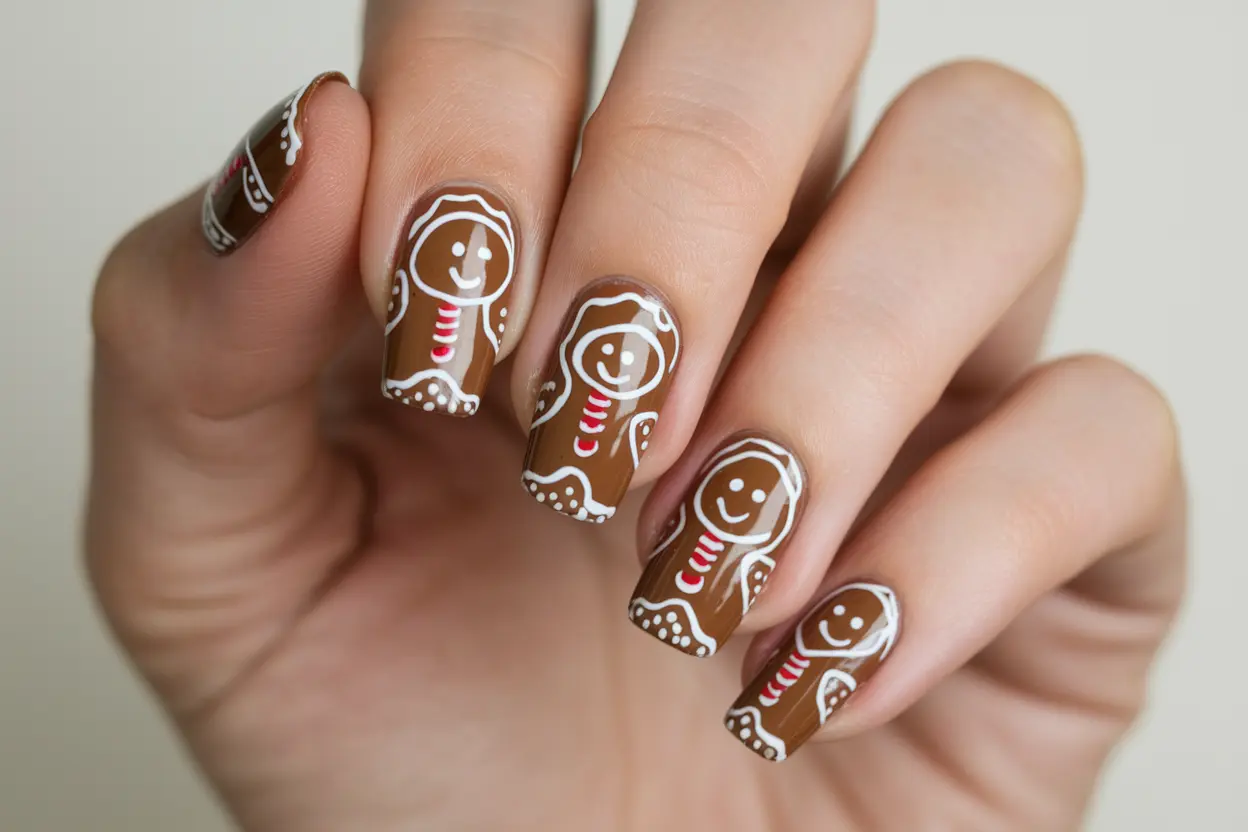
Nails can be a delightful canvas for creativity, and with this step-by-step guide, you can create stunning gingerbread nails right in the comfort of your home. This festive design is perfect for the holiday season and will surely impress your friends and family. With some basic nail supplies and a little patience, you’ll transform your ordinary nails into a delicious-looking treat. Follow along as you unleash your inner nail artist and embrace the warmth of the season with these charming designs!
Preparing Your Nail Canvas: Essential Tools and Supplies
Creating beautiful gingerbread nails at home requires more than just your artistic flair; it demands a well-prepared workspace complete with the right tools. First and foremost, gather high-quality nail polish and base coat to ensure a smooth application and prolonged wear. You’ll need an excellent top coat that seals in your design and adds that glossy finish. A small, fine-tipped brush can work wonders for adding intricate gingerbread-themed details like icing or candy designs. Don’t forget a nail file for shaping and buffing, as well as cuticle oil to nourish and prep your nails for artistry.
Must-Have Equipment for a Flawless Finish
Equip yourself with a few additional tools to enhance your nail art experience. A dotting tool helps create precise dots for sugar-like embellishments or buttons on your gingerbread men. Nail tape can assist in achieving clean lines for any geometric designs. Having a palette or small plate on hand provides a convenient space to mix polishes, creating custom shades to elevate your gingery creation. For easier cleanup, ensure some cotton pads and acetone are available to rectify any mistakes or clean up edges as you work.
Choosing the Perfect Gingerbread Nail Polish Colors
Color plays a significant role in embodying the spirit of gingerbread, so opt for a palette that resonates with warm, cozy tones. Rich browns mimic the sumptuousness of freshly baked cookies. Creamy off-whites evoke frothy icing, while vibrant reds and greens can represent candy accents. The key is layering subtle shades to create depth; for instance, add a shimmery gold or copper hue as a top layer to represent the glistening sugar on your baked treats. By selecting a thoughtful color scheme that reflects gingerbread aesthetics, you can set the stage for a truly enchanting nail design.
Mixing your chosen colors can also lead to delightful surprises. For instance, you might create a lovely blend of brown and copper for a shimmery warm base or add a touch of white to brown for a lighter, creamier look. Don’t hesitate to experiment with textures either—matte finishes can evoke the rustic nature of gingerbread, while glossy ones contrast nicely. Personalization is key to making your gingerbread nails genuinely unique, so feel free to let your creativity shine and discover new color combinations!
Mastering the Art of Nail Care: Prepping Your Nails
The Importance of Nail Health Before Application
Your nails act as a foundation for any nail art, including the trendy gingerbread designs you aim to create. Ensuring optimal nail health is imperative not just for the longevity of your manicure but also for your overall aesthetic. Neglected nails can lead to peeling, chipping, and breakage, which detracts from the beauty of your gingerbread nails. Strong, healthy nails enhance the final look, making your designs more vibrant and flawless. Prioritize your nail care routine to set the stage for a stunning end result.
A regular maintenance routine will contribute significantly to preventing common issues like hangnails, dry cuticles, and nail discoloration. The impact of your nail health reflects directly on how well your nail art pops. A well-prepped nail surface ensures that your colors apply smoothly and evenly, allowing for a professional finish right in the comfort of your home.
Step-by-Step Nail Preparation Techniques
Prepping your nails involves several deliberate steps that can dramatically improve the overall quality of your manicure. Start by gathering your nail tools: a nail file, a buffer, cuticle oil, and a base coat. Begin by removing any old nail polish with a remover, ensuring your nails are free from residue. This sets the stage for applying your new gingerbread nails without contamination from previous products.
Next, trim and file your nails to your desired shape. A square or round edge serves as a perfect canvas for gingerbread art. Buff the surface gently to remove any ridges or imperfections, giving it a smooth finish. After buffing, wash your hands thoroughly and apply a nourishing cuticle oil to soften your cuticles, followed by pushing them back for a clean look. This attention to detail will contribute to a more polished final design.
Step-by-Step Nail Preparation Techniques
| Step | Description |
| 1. Remove Polish | Use a gentle remover to clear any old polish. |
| 2. Trim & File | Shape your nails to your preference, ensuring uniformity. |
| 3. Buff | Smooth the surface with a buffer, focusing on any ridges. |
| 4. Clean & Oil | Wash hands, then apply cuticle oil and push back cuticles. |
Following these preparation techniques correctly ensures that your gingerbread nails not only retain their beauty for longer but also reflect a professional touch. Each step is vital in contributing to an organized and aesthetically pleasing nail surface, crucial for committing to detailed designs. By investing time in nail preparation, you establish a long-lasting base that supports intricate details and vibrant colors, making each gingerbread creation a festive success.
Crafting the Gingerbread Look: Application Techniques
Creating the Base Coat for a Gingerbread Effect
Your gingerbread nail design begins with the perfect base coat. For a rich brown reminiscent of fresh gingerbread, select a deep caramel or chocolate brown polish. After applying a base coat to protect your nails, proceed with two coats of your chosen brown polish. Ensure that you allow adequate drying time between each coat to prevent smudging. If you want a glossy finish, consider applying a top coat that enhances shine. This provides a solid foundation for the intricate details that will bring your gingerbread look to life.
If you prefer a textured look that mimics the roughness of gingerbread cookies, try using a matte brown polish. Matte finishes add a unique dimension to your nails, and when paired with glossy highlights in subsequent steps, they create a delightful contrast. You might even find that a sponge application technique can help you achieve a softer gradient, enhancing the illusion of freshly baked cookies that have just emerged from the oven.
Expert Tips for Achieving a Smooth Finish
A smooth finish sets the stage for your gingerbread nails to shine. Start by ensuring your chosen nail polish is adequately shaken; this helps avoid streaks caused by uneven pigment distribution. Apply in thin, even strokes—this prevents buildup that can lead to an uneven surface. A wide brush can simplify this process, as it spreads the polish more evenly across your nail. Pay particular attention to the edges of your nails; rounding them off slightly can contribute to a more polished look.
- Choose the right brush for quick coverage.
- Thin layers give better results than thick applications.
- Take your time with drying to avoid unwanted smudges.
Knowing these techniques will greatly improve the overall look of your gingerbread nails, ensuring that each layer is perfectly placed and exhibits the right amount of shine.
For an even smoother finish, consider investing in a quality top coat that not only serves as a protective barrier but also enhances the polish below it. Look for fast-drying formulas to minimize your wait time between drying sessions. Additionally, if you find that your nails tend to chip easily, a strengthening base coat can pay off by bolstering durability. Consistency is key; ensuring each application is done thoughtfully will lead to impressive results.
- Use a strengthening base coat if chipping is an issue.
- Fast-drying top coats can make the application process smoother.
- Be consistent with your application technique for best results.
Knowing the right products and techniques will elevate the final outcome, allowing your gingerbread nails to turn heads and spark delight throughout the holiday season.
Elevating Your Design: Adding Decorative Elements
Once you’ve established a solid gingerbread base on your nails, the next step is to elevate your design by incorporating decorative elements. Embellishing your gingerbread nails not only enhances their visual appeal but also reflects your personal style and creativity. This can include anything from intricate icing-like patterns to the addition of 3D elements. The key is to balance the different components to maintain a polished look. Utilize a fine nail art brush for precise detailing and consider using vibrant colors to mimic traditional gingerbread decorations, such as red and green candies.
Techniques for Intricate Icing Designs
The art of creating intricate icing designs may initially seem intimidating, but utilizing a few specialized techniques can simplify the process. Start by practicing with a fine-tipped nail art brush or a dotting tool to create swirling patterns and delicate details reminiscent of piping icing. Incorporating stencils can also aid in achieving those flawless shapes without the pressure of working freehand. Another technique is to layer different colors, allowing each layer to dry before adding more, giving your designs depth and dimension.
The Best Accessories to Enhance Your Gingerbread Nails
Enhancing your gingerbread nails with the right accessories can truly make them stand out. Consider using rhinestones, glitter, and tiny faux pearls to mimic the effect of candy embellishments. Apply a glossy top coat over your designs to provide a brilliant finish and protect the intricate details. Additionally, themed stickers or decals can add an extra layer of festivity to your gingerbread nails, making the overall design more dynamic and holiday-appropriate. The key is to choose accessories that complement rather than overpower the primary gingerbread design.
Maintaining Your Masterpiece: Care and Longevity
Prolonging the Life of Your Gingerbread Nails
To preserve the beauty of your gingerbread nails, proper maintenance is important. Start by applying a high-quality top coat every few days. This not only adds an extra layer of shine but also protects the intricate designs from chips and scratches. Keep your nails hydrated by using cuticle oil regularly, which helps maintain their strength and vitality. Additionally, avoid using your nails as tools for opening packages or scraping surfaces, as this can lead to unwanted damage.
Consider your environment as well. Extreme temperatures or harsh chemicals can affect your nail art. If you’re cleaning, wear gloves to protect your gingerbread design from bleach and other caustic substances. Also, be mindful of prolonged exposure to water, as it can weaken nail adhesives and contribute to lifting. Keeping your nails dry and using gentle products will significantly extend their lifespan.
Troubleshooting Common Issues
Even with the best care, you may encounter some common issues with your gingerbread nails. If you notice any lifting at the edges, it could be due to not applying enough base coat or moisture getting trapped underneath the design. In such cases, a gentle touch-up or adding a layer of top coat can help alleviate the problem temporarily. For chips, try to quickly fix the area by matching the color and design, ensuring the rest of your beautiful nails are left intact.
In rare instances, the intricate designs you lovingly painted might start to blur some days after application. This usually happens if the polish hasn’t dried thoroughly, or if you’ve used a top coat incompatible with your base polish. When this occurs, allow your nails to fully dry before applying any additional layers and consider investing in high-quality products designed to work well together. Also, ensuring that you work in a dust-free, comfortable environment prevents imperfections from settling into your nail art.
Summing up
As a reminder, creating stunning gingerbread nails at home is a fun and inventive way to express your holiday spirit. By following the step-by-step process outlined in this guide, you can achieve beautifully themed nails that are sure to impress your friends and family. From selecting the right base colors to applying embellishments like snowflakes and candy details, each step allows you to personalize your nails to suit your style. Don’t forget to use quality products to ensure your designs last throughout the festive season.
Your gingerbread nails not only add a festive touch but also offer a creative outlet that can be enjoyed alone or as a fun group activity. Take your time with each detail for the best results, and don’t hesitate to experiment with variations to make the design uniquely yours. With a little practice and dedication, you can turn your nails into a playful canvas that captures the joy of the holiday season. Happy decorating!