DIY Valentine’s nail art is a fun and creative way to express your love and add a personal touch to your look this holiday. With a variety of charming designs and easy-to-follow tutorials, you can transform your nails into a canvas of heartwarming expressions. Whether you’re a beginner or an experienced nail artist, this guide will provide you with everything you need to create stunning Valentine-themed nail art that will impress your loved ones and make your manicure truly unique. Let’s examine the world of DIY nail art and unleash your creativity!
Essential Tools for Nail Art Success
Having the right tools can be the difference between a manicure that dazzles and one that disappoints. Invest in a quality nail art kit that includes everything you need, from polishes to precision tools, to streamline the application process and afford you the creativity to express yourself this Valentine’s Day. With the right tools in hand, you’ll be better equipped to tackle varying designs and techniques, ensuring your nail art looks professional and polished.
Must-Have Supplies for DIY Nail Art
Your DIY nail art journey starts with a solid selection of supplies. Stock up on base and top coats, a variety of nail polishes in different colors, nail tapes, dotting tools, and nail art brushes. Having these supplies will enable you to create stunning designs, from simple hearts to intricate patterns. Don’t forget items like a good-quality nail clipper, file, and cuticle pusher to prep your nails beforehand!
The Importance of Quality Brushes and Tools
Quality brushes and tools can elevate your nail art experience significantly. Cheap products often shed bristles, creating uneven application and frustration. Investing in a set of high-quality brushes designed specifically for nail art allows you to achieve precision and control, making it easier to create fine lines and detailed designs. Look for brushes with varying thicknesses, so you can experiment with textures and styles, ensuring your artistic vision comes to life seamlessly.
By using high-quality brushes and tools, you minimize the risk of damage to your nails and cuticles. Precision tools help in achieving clean lines, while durable brushes retain their shape, making them perfect for detailed work like accents and fine designs. Consider brands that specialize in professional nail art, as they often provide a better user experience and longevity, leaving you with spectacular results you’ll be proud to show off. Investing in quality gear can make DIY nail art feel more like a creative hobby and less like a chore.
Color Palette Choices: Setting the Mood
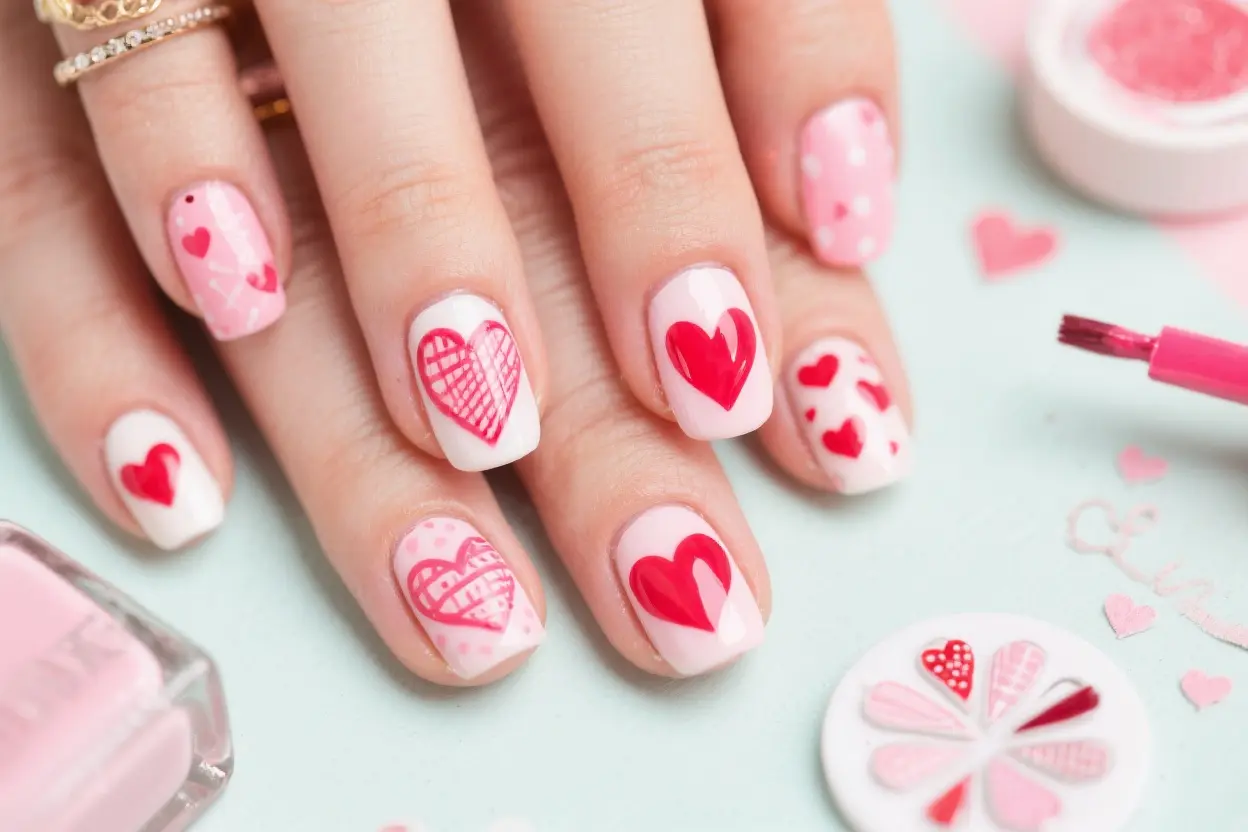
Your choice of color palette can elevate your Valentine’s nail art from ordinary to extraordinary. Selecting the right combination not only showcases your creativity but also reflects the emotions and sentiments associated with the occasion. Think about hues that evoke warmth and affection, like soft pastels or vibrant reds and pinks. These colors not only exude a romantic vibe but also allow for various designs like hearts, flowers, or even abstract patterns, making your nails the perfect canvas for love.
Shades That Speak Love: Romantic Color Combinations
Seasonal Variations: Adapting Colors for Specific Valentine’s Themes
Your Valentine’s nail art can reflect seasonal trends and specific themes by varying the colors used. For instance, around Valentine’s Day, traditional shades of red and pink dominate. However, you can enhance your designs with unexpected colors to fit different themes. If you’re hosting a Galentine’s gathering, vibrant shades like purple and fuchsia can feel empowering. Meanwhile, for a winter-themed love, icy blues and silvers may evoke a cool but romantic atmosphere. These variations keep your look fresh and exciting, ensuring your style reflects your personality and the unique vibe of your celebration.
Step-by-Step Tutorials for 5 Trending Valentine’s Nail Designs
| Design | Description |
|---|---|
| Heartfelt Ombre | A playful gradient technique featuring soft heart shapes. |
| Classic Love Letter | Nail art inspired by the timeless symbol of romance. |
| Floral Elegance | Stunning rose designs to bring a touch of nature’s beauty. |
| Geometric Love | Modern interpretations of hearts and geometric shapes. |
| Whimsical Cupid | Fun, illustrative designs celebrating Cupid’s charm. |
Heartfelt Ombre: A Playful Gradient Technique
This design allows you to blend colors seamlessly, offering a romantic gradient look that’s perfect for Valentine’s Day. Start with a base color, and then use a sponge to dab on two or three hues, blending them together for a heartwarming finish.
Classic Love Letter: Nail Art Inspired by Romance
With a bright red or soft pink base, you can create tiny envelopes or hearts on each nail. Use a fine brush to add details like love notes and seals to capture that timeless romance vibe.
For this design, sketch out simple envelope shapes using a white or silver nail art pen to resemble letters. Next, paint tiny hearts or write your initials on each envelope for a personal touch. Finish with a top coat for a glossy look that lasts throughout your love-filled day.
Floral Elegance: Creating Stunning Rose Designs
To bring the beauty of nature to your nails, start with a light base color and use a detailed brush to paint beautiful roses. Layer different shades of pink and green to create depth and life in your floral masterpieces.
Begin with a pastel or neutral base to highlight your floral designs, and use a fine brush to create petal shapes with varying shades of pink. Add green leaves for contrast and texture, ensuring to focus on detailing within each rose to elevate the art. This design usually stands out and can easily be customized to your taste.
Geometric Love: Modern Takes on Hearts and Shapes
For a modern twist, combine different shapes like triangles and diamonds with heart motifs. You’ll be surprised at how simple patterns can evoke romantic feelings.
Use bold colors in contrasting shades to create eye-catching geometric designs. Start with a solid base color and then add shapes like triangles or stripes in white or gold. Adding small hearts or dot accents can seamlessly integrate romance into this stylish approach, perfect for making a bold statement on Valentine’s.
Whimsical Cupid: Fun Illustrative Nail Art
Add a cute twist to your nails by depicting Cupid himself along with arrows and hearts. This playful style is sure to bring a smile to anyone’s face.
Begin by painting a light background, followed by sketching out adorable Cupid illustrations with fine brushes or nail pens. Including elements like arrows and playful hearts will enrich the whole vibe of the design. Experiment with colors to create a delightful scene, ensuring that each nail tells a story of love and whimsy.
Troubleshooting Common DIY Nail Art Problems
Even seasoned nail artists encounter challenges when creating intricate designs. Discovering solutions for common DIY nail art problems can elevate your Valentine’s Day manicure from frustrating to fabulous. Whether it’s dealing with uneven application or unsightly smudges, knowing how to navigate these hiccups ensures your nails remain the star of the show. Dive into the specifics of how to troubleshoot and perfect your techniques.
Avoiding Common Mistakes: What Not To Do
Skipping base and top coats can lead to premature chipping and dull finishes, so always start with a foundation. Overloading your brush with polish might cause streaks and uneven layers, leading to an unsightly look. Rushing your nail art without allowing time for drying will result in smudging, erasing all your hard work. Failing to prep your nails adequately, like trimming and buffing, can affect the overall appearance of your design.
Solutions for Uneven Application and Smudging
To achieve even application, use thin layers of polish and allow ample drying time between them. A steady hand and slow, deliberate strokes can help too. For smudges, consider using a quick-dry top coat to seal your design effectively. Additionally, ensuring your nails are free of oil or residue before painting can significantly improve adhesion and finish.
When dealing with uneven application, focus on the consistency of your polish; thicker polishes are notorious for creating lumps, so consider thinning them with a few drops of polish thinner. A clean-up brush dipped in acetone can rectify any errant marks if you’ve smudged your design. If you accidentally touch your nails before they dry, don’t despair—allow them to dry completely, and then gently remove the imperfection with a clean brush or swab. Mastering these techniques will not only fix current issues but also help you develop an eye for creating flawless nail art in the future.
Elevating Your Nail Art Game: Advanced Techniques to Try
To truly elevate your nail art, incorporating advanced techniques can showcase your creativity and precision. Here are some methods to consider:
- Nail Art Stencils
- Nail Foils
- Glitter Application
- 3D Nail Art
- Marbling Techniques
| Technique | Description |
|---|---|
| Nail Art Stencils | Pre-cut shapes or designs that allow for intricate patterns. |
| Nail Foils | Thin sheets that add a metallic finish and unique designs. |
| Glitter Application | Adding shimmer to your nail art through various glitters. |
Introducing Nail Art Stencils: Taking Precision to the Next Level
Nail art stencils transform your manicure by allowing for detailed patterns without the need for steady hands. These stencils come in numerous designs—from hearts to intricate floral patterns—ensuring you can find the perfect fit for your Valentine’s aesthetic. Simply place the stencil on your nail after applying a base coat, paint over it, and peel it off to reveal a flawless design.
Utilizing Nail Foils and Glitter for Added Glamour
Adding nail foils and glitter introduces an eye-catching sparkle, elevating your artwork. Foils lend a luxurious touch with their shiny, reflective surfaces while glitter can be incorporated for dramatic effects.
Utilizing nail foils and glitter requires some finesse; however, the results are often striking. Begin with a base color, then carefully apply your chosen foil using nail glue, ensuring it adheres perfectly. For a glitter finish, sprinkle the desired amount over wet polish or use a clear topcoat to seal it all in place. Both techniques provide a glamorous finish that dazzles, making your nails unforgettable for date night or any Valentine’s celebration.
To wrap up
Ultimately, you now have the tools and step-by-step guidance to create stunning DIY Valentine’s nail art. By following the techniques outlined in this guide, you can express your creativity and add a personal touch to your manicure for the occasion. Whether you prefer elegant designs or playful patterns, your newly acquired skills will help you achieve fabulous results. So gather your supplies, unleash your inner artist, and make this Valentine’s Day memorable with your beautifully crafted nails!